Welcome!

Welcome to Natasha's Creative Confections! If you have stumbled upon this blog page, then you're in for a real treat! One of my favorite things to do is bake. If you choose to read on you will find pictures and recipes of some of the fabulous treats that I have created. So take a look around and enjoy!

Wednesday, May 25, 2011

Princess Castle Birthday Cake


So, for awhile there, I was on a roll with my blogging...but, these past few weeks have been pretty rough for me. I've been suffering from TMJ pain for over 2 weeks, so it has been really hard to do much of anything, besides try and rest. Hopefully all will be back to normal sooner than later.

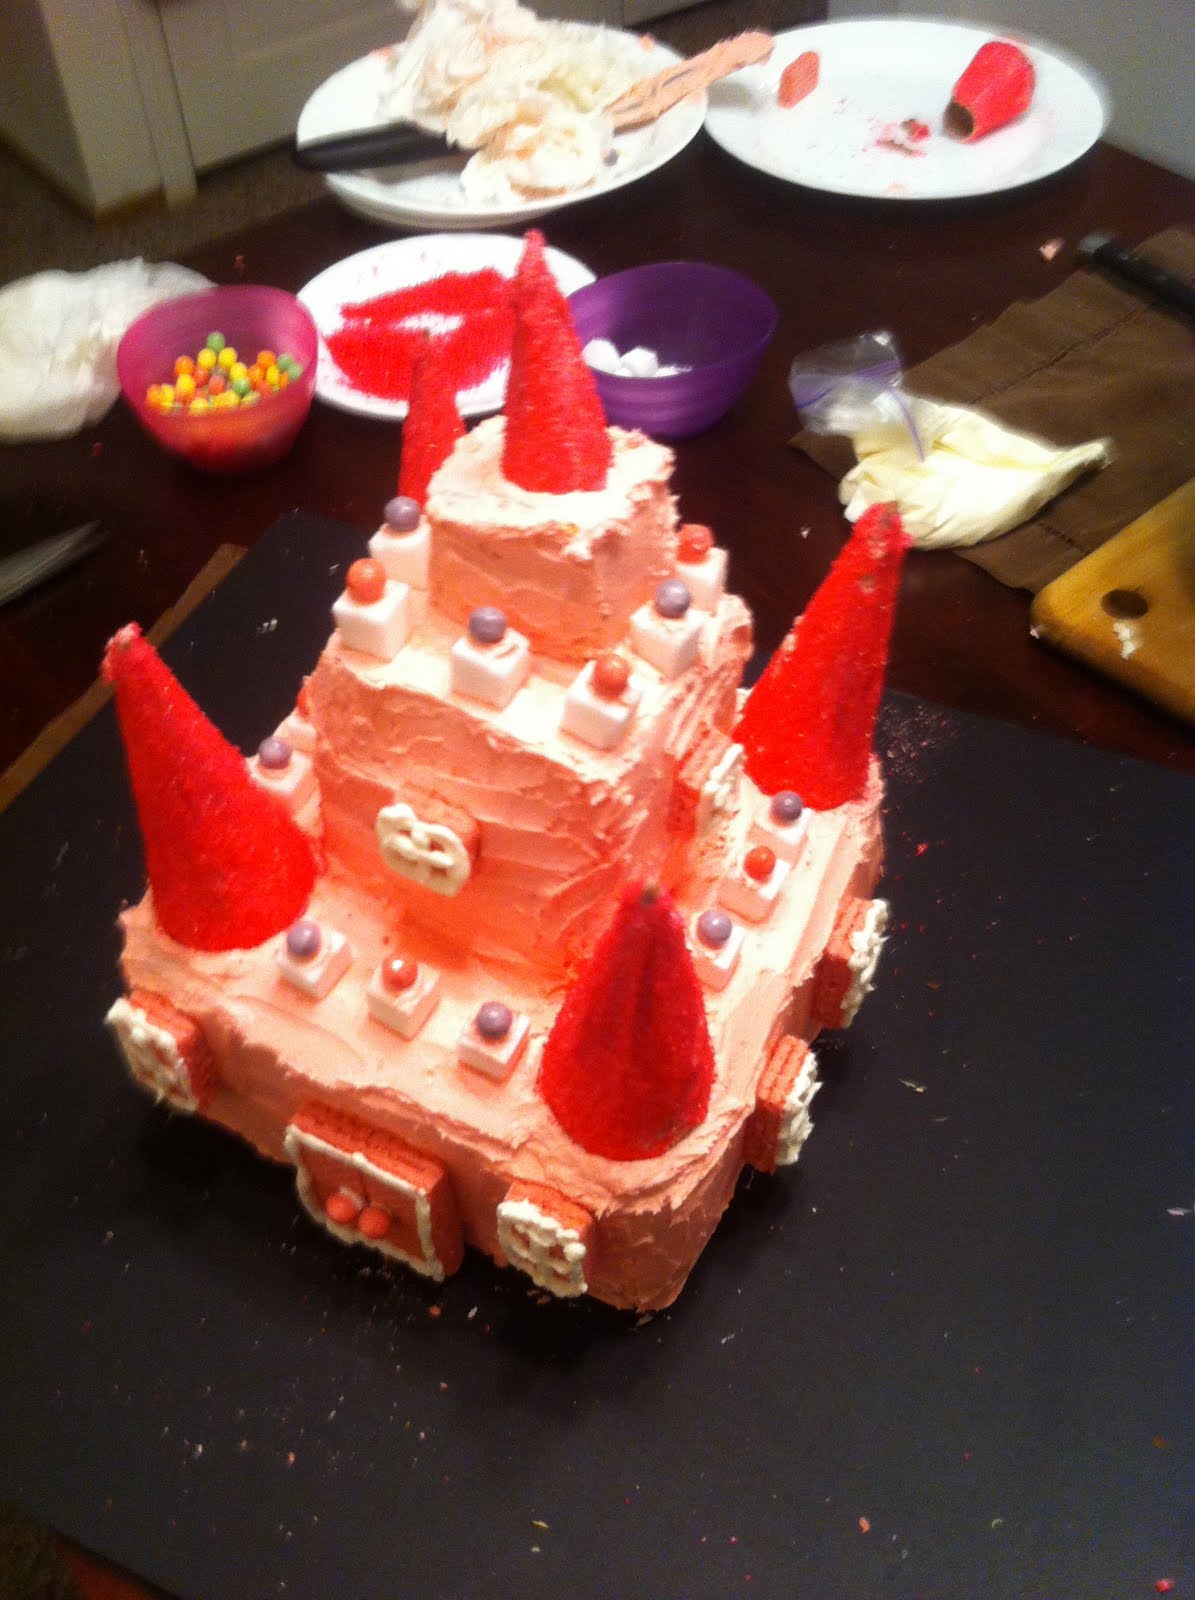
This past weekend I had the opportunity to bake a cake for my friend's daughter! I was excited because the was my first time baking for a birthday party. There was a specific cake in mind, so I studied the video on youtube and wanted to try and recreate this adorable cake for the birthday. The cake is in the shape of a castle--something I've never done before, so I knew it would be a bit challenging. The video makes building this cake simple, and it really isn't hard, but it does take a good amount of time and patience :)

I made white cake, and I'll admit, I cheated and used the box. I knew that it was going to take me awhile and I needed 4 8" square pieces to build with. It would have added a lot of time to make it all from scratch, and I wanted to focus more energy on the actual design. I did make the hot pink frosting from scratch though--which was definitely necessary, because I wasn't sure how much I was going to need to frost the entire cake. After baking the cakes, cooling them, assembling them, frosting, setting the frosting, and completing the decorations, I was exhausted! I definitely felt as though I accomplished what I had set out to do.


I was a little disappointed that it seemed a little slanted toward the top, but I couldn't figure out a way to fix it without ruining the cake! Next time, I will need dowels--or something to hold it together better than toothpicks! But, I am still learning here...


My husband helped me transport the cake to my friend's house, and I was so hoping it wouldn't collapse. It needed to stay together overnight because I had made it the day before too! We got it there safely...and I was told it stayed beautifully until the party the next day. I received several compliments on the cake, which was really nice to hear. I'm so glad it turned out and that I was able to pull off a special birthday cake. I hope there are more to come :)

For the Buttercream Frosting:
~3 cups confectioners sugar
~1 cup butter
~1 teaspoon vanilla extract
~1-2 Tablespoons whipping cream
~Red food coloring

In a standing mixer fitted with a whisk, mix together sugar and butter. Mix on low speed until well blended and then increase speed to medium and beat for another 3 minutes. Add vanilla and cream and continue to beat on medium speed for 1 minute more, adding more cream if needed for spreading consistency. If you want to make the frosting pink, add red food color until you reach color desired.


**I doubled this recipe to frost this cake!

Here is the link to the youtube video if you wish to check it out!

Thursday, May 12, 2011

Grasshopper Cake for Mother's Day


I had this WHOLE blog typed out...and it was a long one, recipe and everything. However, blogger had to, of course, stop working after I typed it up, didn't save ANY OF IT, so now I have nothing to share :(

I spent almost an hour typing everything about this cake out. This was one of the best cakes I've made, and I was so excited to share. But now, I don't feel like re-typing everything.

I know I don't have very many readers haha, but if you are curious about this cake, please leave me a comment or send me a message and I will gladly give you the recipe. It was such a great cake that if you tried it, I know you would love it.

Chocolate and mint....what's NOT to love? :D

HERE IS THE RECIPE! I typed it up for a friend and decided that I might as well post it on here in case anyone else is interested!
Ingredients for the Classic Chocolate Cake Layers:

3/4 cups dark unsweetened cocoa powder
1 1/4 cups hot water
2/3 cups sour cream
2 2/3 cups all-purpose flour
2 teaspoons baking powder
1 teaspoon baking soda
1/2 teaspoon salt
3/4 cup (1 1/2 sticks) unsalted butter, softened
1/2 cup vegetable shortening
1 1/2 cups granulated sugar
1 cup firmly packed dark brown sugar
3 large eggs, at room temperature
1 Tablespoon pure vanilla extract

Ingredients for the Creme de Menthe Buttercream:

2 1/4 cups sugar
1/2 cup all-purpose flour
2 1/4 cups milk
1/2 cup heavy cream
4 1/2 sticks unsalted butter, soft but cool, cut into small pieces
2 Tablespoons creme de menthe
2 1/4 teaspoons peppermint extract

Ingredients for the Mint Chocolate Ganache:

6 ounces dark chocolate (60-72% cacao), coarsely chopped
1/2 cup heavy cream
1 Tablespoon creme de menthe
1/2 teaspoon peppermint extract

Make the Classic Chocolate Cake Layers:
1. Preheat the oven to 325 degrees F. Butter three 8-inch round cake pans, line the bottoms with parchment paper, and butter the parchment. Dust with flour, and knock out the excess flour.
2. In a medium bowl, combine the cocoa powder, hot water, and sour cream and set aside to cool.
3. Sift the flour, baking powder, baking soda, and salt together into a medium bowl and set aside.
4. In the bowl of an electric mixer fitted with the paddle attachment, beat the butter and shortening on medium speed until light and fluffy and ribbon-like, about 5 minutes. Add the sugars and beat until light and fluffy, about 5 more minutes. Add the eggs, one at a time, beating well after each addition, then add the vanilla and beat until incorporated. Scrape down the bowl and mix again for 30 seconds.
5. Add the flour mixture, alternating with the cocoa mixture, in three additions, beginning and ending with the flour mixture.
6. Divide the batter among the prepared pans and smooth the tops. Bake for 35-40 minutes, rotating the pans halfway through the baking time, until a toothpick inserted in the center of each cake comes out clean. Transfer the cakes to a wire rack and let cool for 20 minutes. Invert cakes onto the rack, remove the pans, and let cool completely. Remove the parchment.

Make the Creme de Menthe Buttercream:
1. In a medium heavy-bottomed saucepan, whisk the sugar and flour together. Add the milk and cream and cook over medium heat, whisking occasionally, until the mixture comes to a boil and has thickened, about 10-20 minutes.
2. Transfer the mixture to the bowl of an electric mixer fitted with the paddle attachment. Beat on high speed until cool. Reduce the speed to low and add the butter; mix until thoroughly incorporated. Increase the speed to medium-high and beat until the frosting is light and fluffy.
3. Add the creme de menthe and peppermint extract and mix until combined. If the frosting is too soft, put it in the refrigerator to chill slightly, then mix again until it is the proper consistency. If the frosting is too firm, set the bowl over a pot of simmering water, then mix again.

Make the Mint Chocolate Ganache:
1. Put the chocolate in a medium heatproof bowl and set aside.
2. In a small saucepan over medium heat, bring the cream just to a boil. Remove from the heat and pour the cream over the chocolate. Let the cream sit for 2 minutes, then starting in the center of the bowl and working your way out to the edges, slowly stir the chocolate and cream mixture in a circle until the chocolate is completely melted and the mixture is smooth. Add the creme de menthe and peppermint extract and stir until combined. Whisk for another few minutes to cool the ganache slightly, then let the ganache come to room temperature, about 15 minutes, whisking occasionally.

Assemble the Cake:
Place one cake layer on a serving platter. Trim the top to create a flat surface. Use an offset spatula to spread about 1/4 cup of the ganache on top of the layer. Put the cake in the refrigerator for 1 minute to let the ganache set. Spread about 1 1/4 cups of the buttercream on top of the ganache. Top with the next cake layer, trim and frost with ganache and buttercream, then add the third layer and trim. Crumb coat the cake and put the cake in the refrigerator for 15 minutes to firm up the frosting. Frost the sides and top with the remaining buttercream. Garnish the cake with grasshopper or mint cookies (I broke them into small pieces and spread on top of the cake), if desired. Refrigerate the cake for about 15 minutes to firm up the finished cake.

*This cake will keep beautifully in a cake saver and room temperature (cool and humidity free) for up to 3 days. If your room is not cool, place the cake in a cake saver and refrigerate for up to 3 days. Remove the cake from the refrigerator and let it sit at room temperature for at least 2 hours before serving.

Wednesday, May 4, 2011

Weekend Treats


This past weekend, Chad and I got to go down to visit his family in Arroyo Grande and help out at an Antique show his mom and sister were both working. We were able to go down for this last year as well and it was a lot of fun!

My mother-in-law had a booth for the Fruit & Veggie stand she works at and Kelli had one for her new bakery: Sweet Pea's Bakery. Kelli is famous for her Macaron, which is a french cookie made with egg whites, granulated sugar, ground almond, and food coloring. The macaron is commonly filled with buttercream or jam filling in between two cookies. They are pretty tasty! She has several different flavors: Vanilla, Chai, Rose, Pistachio, Creme de Menthe, Chocolate Lavender & Vanilla Coffee. (I might be leaving some more out...)


Chad and I got to help Kelli sell her yummy treats and we had tons of fun. Her cookies were so popular, we sold out completely! Everyone loved them :)

I'll have to try a batch for myself and see how they turn out!